
Nikuman: Steamed Buns
Servings: 2 people
Ingredients
For the Dough
- 300 g Plain flour
- 20 g Caster sugar
- ½ tsp Sea salt
- 1 tsp Baking powder
- 1 tsp Fast action dried yeast
- 1 tbsp Vegetable oil
- 170 ml Water
For the Filling
- 200 g Dried shiitake mushrooms
- 120 ml Water
- 2 Spring onion finely sliced
- 300 g White cabbage finely shredded, OR 150 g Pork mince
- ½ tsp Sea salt
- 10 g Fresh ginger 1 tbsp, grated
- 1 tsp Sugar
- 1 tbsp Light soy sauce
- 1 tbsp Sesame oil
- 1 tbsp Cornflour
- Cracked black pepper to taste
To Serve
- Light soy sauce
- Wasabi paste
- Japanese hot mustard
- Mayonnaise
Method
For the Dough
- Combine the plain flour, caster sugar, sea salt, baking powder and dried yeast in a large bowl.
- Add the vegetable oil and gradually pour in the water while mixing until a dough forms.
- Transfer to a lightly floured surface and knead for 10–15 minutes until smooth and elastic.
- Place the dough in a lightly oiled bowl, cover and leave in a warm place for 30–60 minutes, or until doubled in size.
For the Filling
- Soak the dried shiitake mushrooms in 120 ml water for 10–15 minutes until softened.
- Finely slice the spring onions.
- If using cabbage, sprinkle with the sea salt and leave for 10 minutes. Squeeze out any excess moisture.
- Squeeze the mushrooms dry, remove the stems and finely chop.
- Combine the mushrooms, spring onion and cabbage or pork mince in a bowl.
- Add the fresh ginger, sugar, light soy sauce, sesame oil, cornflour and cracked black pepper.
- Mix thoroughly until sticky and well combined.
Shape the Buns
- Cut twenty 8 cm x 8 cm squares of greaseproof paper.
- Turn the dough onto a lightly floured surface and divide into 20 equal portions.
- Roll each piece into a ball and cover with a damp cloth. Rest for 10 minutes.
- Flatten each ball and roll into a round approximately 10 cm in diameter.
- Place 1½ tbsp of filling in the centre.
- Pleat and pinch the dough around the filling to seal completely.
- Place each bun onto a square of greaseproof paper.
- Cover loosely and leave to prove for 20 minutes.
Steam the Buns
- Bring water to the boil in a pan fitted with a steamer.
- Arrange the buns in the steamer, leaving space between each one.
- Steam over high heat for 10 minutes.
- Serve immediately with light soy sauce and your choice of wasabi, Japanese mustard or mayonnaise.

Dipping Sauce for Dumplings
This was pre made for you by chef.
Servings: 2 People
Ingredients
- 1 tbsp Soy sauce
- 1 tbsp Ponzu
- 1 tsp Black vinegar
- 1 tsp Water
- 1 tbsp Honey
- 1 clove Garlic Mashed or Grated
- 1 tsp Fresh ginger Grated
For Korean Dipping Sauce
- 1/2 tsp Gochugaru Korean chilli flakes
To Garnish
- 1 tbsp Spring onion sliced, optional
Method
- Mix all the ingredients in a bowl and refrigerate until needed.

Smoked Salmon Maki
The smoked salmon and ingredients are wrapped in nori (seaweed) on the outside, often paired with creamy avocado or cream cheese, crisp cucumber, and occasionally chives.
Servings: 2 people
Ingredients
- 110 g Sushi rice cooked
- 100 g Smoked salmon sliced it into thick batons
- 1 Carrot sliced into matchsticks
- 1 Spring onion sliced into strips
- 1/2 Avocado sliced
- 50 g Mooli (daikon) radish sliced into batons
- 1 Yaki-nori seaweed sheets
- 1 tsp Kewpie mayonnaise
- 1 tsp Pickled ginger
- 2 tsp Soy sauce
Method
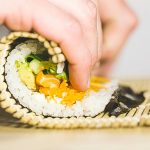
- Place the nori smooth side down, on a sushi mat. It helps to wrap the mat in clingfilm beforehand..
- Wet your fingers in a dish and place a small handful of the sushi rice on the nori wrapper.
- Spread rice to cover the nori, leaving around an inch uncovered, at the top of the sheet.
- Set your filling two-thirds of the way up the rice. Be sure to place items end-to-end.
- Slowly roll the sushi with your thumbs under the mat and use your fingers to hold the filling in place.
- Roll until the rice at the bottom of the sheet meets the rice at the top, then give everything a gentle squeeze.
- Wet the uncovered nori and roll the sushi forward to seal.
- Serve with pickled ginger, Kewpie mayo, and soy sauce.
How to Cook Sushi Rice
Servings: 2 People
Ingredients
- 150 g Sushi rice we prefer Nishiki or Yutaka Koshi
- 165 ml Water
Seasoning
- 2 tbsp Rice vinegar
- 12 g Caster sugar
- 1 1/2 tsp Sea salt to taste
Method
- Soak rice before rinsing for 20 minutes for more tender grains.
- Rinse at least 3-4 times under running cold water, until it runs clear.
- Place water and rice in a cold pan with no lid, then heat until simmering.
- After bubbles appear, place the lid on your pan, turn the heat down and simmer for 11 minutes.
- Turn off the heat and let rest for 20 minutes, do not remove the lid.
Seasoning
- Combine rice vinegar, sugar and salt in a small sauce pan and cook until the sugar has dissolved, and the liquid has reduced down by half.
- Add the seasoning to your rice, mix well and chill well in a refrigerator before using.
Tips and Rules for Steak
Method
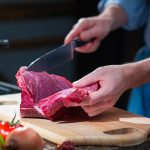
- Buy your steak from a local butcher for better quality meat. They will be able to guide you on the various cuts available.
- Always take the cuts of beef out of the fridge and loosely cover. Your beef should be at room temperature before you start cooking. This helps to make the meat more tender and stops the centre from being cold.
- Dry the meat on kitchen paper - never wash in water - washing spreads bacteria and also makes the meat mushy. A terrible practice!
- Don’t be afraid of the cheaper cuts such as Ox Cheek, Skirt and Tongue - they are full of flavour and just need cooking in different manners.
- Rather than oiling the pan, brush the steak with oil to prevent it sticking.
- After cooking, always rest the steak, loosely cover for around 1/3 the cooing time.

Fillet Steak with Ginger Coconut Sauce
Servings: 2 people
Ingredients
For the Steak
- 280 g Barrel fillet steak
- 1 tbsp Olive oil
- 20 g Butter
- Sea salt to taste
- Cracked black pepper to taste
For the Ginger Coconut Sauce
- 1 White onion diced
- 2 clove Garlic minced or grated
- 15 g Fresh ginger 1 tbsp, grated
- 1 Carrot peeled and grated
- 1 tsp Mild curry powder
- 2 tsp Japanese curry powder or madras powder
- 100 ml Vegetable stock
- 300 ml Coconut milk
- 1 tbsp Light soy sauce
- Sea salt to taste
- Cracked black pepper to taste
Method
Prepare the Sauce
- Heat the olive oil in a saucepan over medium heat.
- Add the white onion, garlic, fresh ginger, mild curry powder and Japanese curry powder. Cook for 2–3 minutes until fragrant.
- Add the grated carrot and cook for a further 2 minutes.
- Pour in the vegetable stock, coconut milk and light soy sauce.
- Simmer gently for 20 minutes until slightly reduced.
- Season with sea salt and cracked black pepper to taste.
- Blend until smooth if preferred.
Cook the Steak
- Remove the steak from the fridge 30 minutes before cooking.
- Season with sea salt and cracked black pepper.
- Heat a pan over high heat and add the olive oil.
- Sear the steak to your preferred doneness.
- Add the butter during the final minute and baste the steak.
- Rest for 5–10 minutes before slicing.
To Serve
- Slice the steak.
- Spoon over the ginger coconut sauce.
- Serve immediately.

Sunomono Pickled Salad
Servings: 2 people
Ingredients
- 1 Cucumber
- 100 g Mooli (daikon) radish finely diced
- 2 Spring onion finely sliced
- 1 Carrot peeled into ribbons
- 120 ml Rice vinegar
- 50 g Caster sugar
- 1 tbsp Gochujang paste
- ½ tsp Sea salt
Method
- Lightly crush the cucumber with a rolling pin until it begins to crack. Slice thinly.
- Peel the mooli and dice as finely as possible.
- Finely slice the spring onions.
- Peel the carrot and use a peeler to create long ribbons.
- In a bowl, combine the rice vinegar, caster sugar, gochugaru and sea salt. Stir until the sugar and salt have dissolved.
- Add the cucumber, mooli, spring onion and carrot.
- Mix thoroughly to coat all the vegetables in the pickling liquid.
- Cover and refrigerate for at least 20 minutes before serving.


